Flow
Workflows on contributing to V² in ready to use quality.
Adding Articles
How to add one article or an article group to V² Site.
V² Site offers a lot of Automation for Articles. Such as Navigation Menus, Readiness Ratings and the integration into V²Flow. To benefit from the Automation the article need to be set up correctly. This illustrated tutorial shows how to. No special knowledge to V² Site is required. You must have a GitHub account and at least be able to navigate the web interface of GitHub. If you are not member of the core team (if you have no write privileges to this repository* you still can add articles by First: Create a Fork, Second: Follow these instructions, Third: create a Pull Request.
- V²
- Plan
- Flow
- Publishing
- Adding Articles
Get involved: edit Article, report issues and ideas, see what we are working on in GitHub. Read → More
Table of Contents
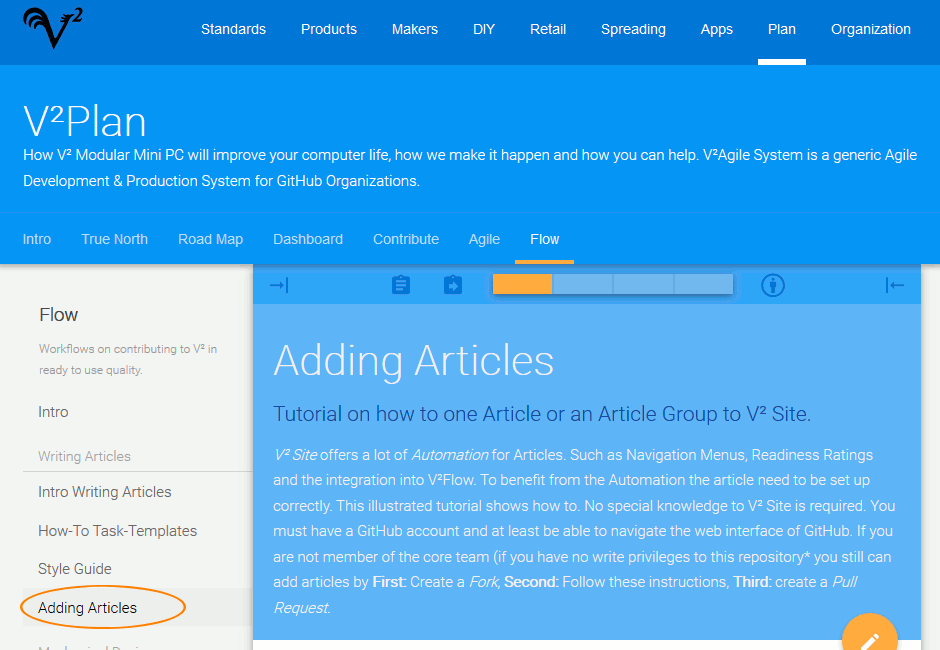
Where to Add the Article
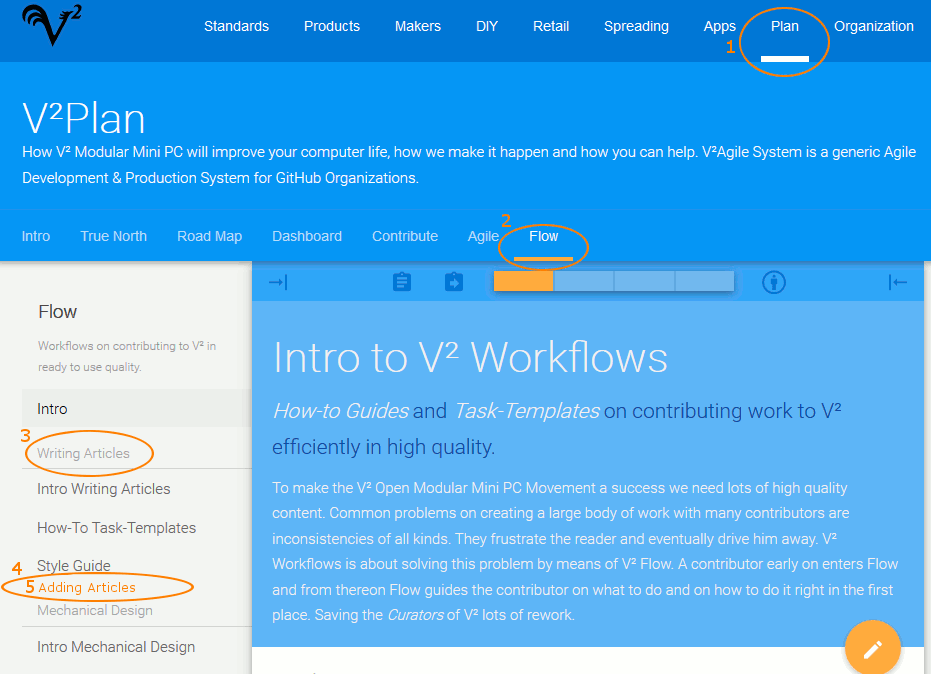
Go to the place where you want to add the article, then identify:
- What is the Baord: Plan
- What is the Book: Flow
- What is the Article Group: Writing Articles
- Where you want to place the new Article: Under “Style Guide”
- What is the new Article’s name: Adding Articles
- Create Path: V² > Plan > Flow > Writing Articles > Adding Articles
Creating Menu Entry
Get ready to edit book-bar.yaml

- Go to V² > V-Squared.github.io > _data
- Note: Make sure it is in the Master Branch
- Pick the Board in which you want to add the Article
- Note: In this example we choose Plan
- Open “book-bar.yml”
- Click the Edit Button
- Add the Article into the tree structure of this yml document
- Note: The syntax should be obvious to you after reading this file. If not, please read -> Wikipedia > YAML
- Example code change
Find where to edit
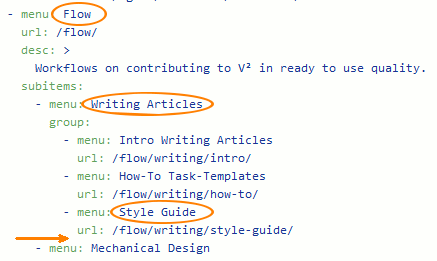
- Remember Path: V² > Plan > Flow > Writing Articles > Adding Articles
- Remember where to place: Under “Style Guide”
- Find the place to add the Article
Add Article to book-bar.yaml
Duplicate Entry
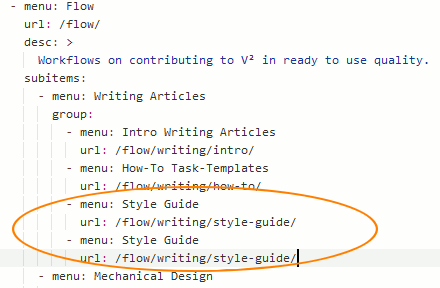
Duplicate an entry of same type as we need.
Edit Entry

Edit the duplicate to match the article we want to create.
Commit your Change
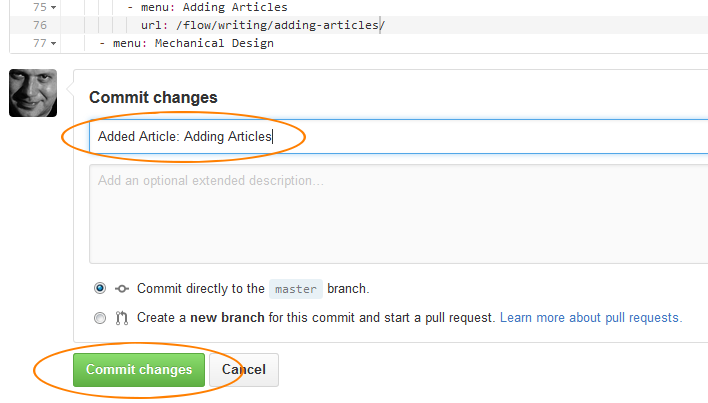
- Enter Commit Message
- Press Button Commit Changes
Create the Article-Issue
Create new Issue

- Go to Issues of V-Squared/V-Squared.github.io
- Click button: “New issue”
Add Content to Article Issue
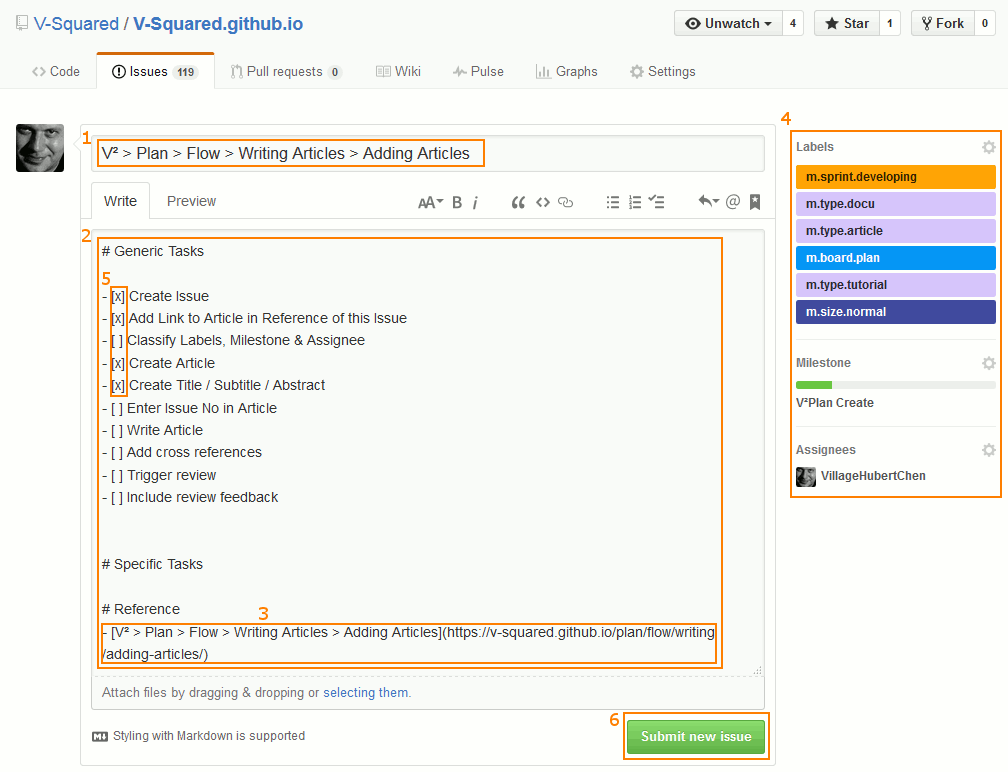
- Paste the Path into the Title field
- Paste Issue Task Template into the Leave a comment field
- Update Article-Path and Article URL in Reference section of Issue Task Template
- Note: You will use this link when you want to open the matching article to this issue.
- Add: Labels, Milestones, Assignees
- Note: Labels that start with “m.” are mandatory, instead “o.” is optional.
- Tick completed tasks
- Press: *Submit new issue”
Issue Task Template
# Generic Tasks

- [x] Create Issue
- [ ] Add Link to Article in Reference of this Issue
- [ ] Classify Labels, Milestone & Assignee
- [ ] Create Article
- [ ] Create Title / Subtitle / Abstract
- [ ] Enter Issue No in Article
- [ ] Write Article
- [ ] Add cross references
- [ ] Trigger review
- [ ] Include review feedback


# Reference
- [Article > Path > ???](Article/URL/???/)
Note Issue Number

In this case the Issue Number is 185. You need it later to link the Issue to the Article.
Create Article File
Create File
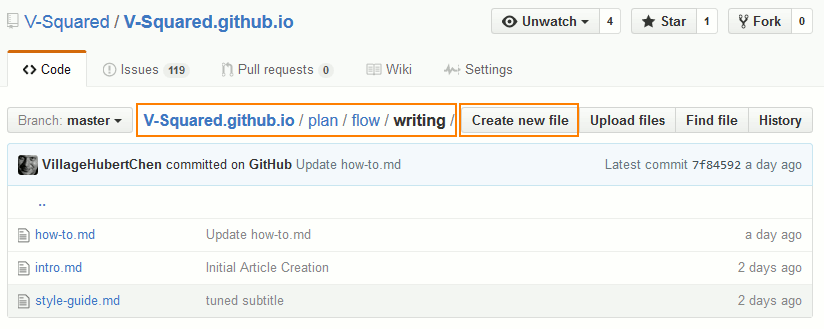
- Remember Path: V² > Plan > Flow > Writing Articles > Adding Articles
- Go to corresponding folder in <>Code: V-Squared.github.io/plan/flow/writing/
- Click “Create new File* button
Add Content

- Enter file name: “adding-articles.md”
- Note: If this does not match your entry in book-bar.yml you will get a 404 Error when browsing to this page in the Article-Bar.
- Note: Remember to add the extension “.md”. This indicates that the file content is of Markdown type.
- Copy Paste the YML Template (see below)
- Fill out the YML Template
- Note 1: You can use markdown formatting in subtitle and abstract if you use the greater sign: “>” in combination with new line and tab indent. See the screen snapshot.
- Note 2: Except for the above you are not allowed to use new line within values.
- Enter Commit Message
- Press Button: “Commit new file”
YML Template
---
layout: page
title:
subtitle:
abstract:
issueNo:
readiness:
   - is-active
---
Check the Added Article
- Reload the Article Page
- The added article should show up in Article Navigation Bar
- Click the newly addded article. It should load properly
Add Issue Number in Article
If the Issue is not yet linked to the Article yet, you can link it like so:
Hovering V²-Flow-Button

Hovering shows you the Tooltip to the V²-Flow-Button with link to its help.
Clicking V²-Flow-Button

- On click the Floating Action Menu of the V²-Flow-Button is shown. Select: “Edit Article”.
- Click the “Edit Article” Button
- The GitHub text editor opens in a new tab with the mathching markdown file to the article.
Linking the Issue

- Enter the Issue Number to the property: “issueNo:** Note 1: See above on how to find the value of the issue number Note 2: Make sure to have a space between the colon and the number
Tip: Create Article Group
Step 1: Create the Menu Entries
- menu: Flow
  url: /flow/
  desc: >
    Workflows on contributing to V² in ready to use quality.
  subitems:
    - menu: Writing Articles
      group:
        - menu: Intro Writing Articles
          url: /flow/writing/intro/
        - menu: How-To Task-Templates
          url: /flow/writing/how-to/
        - menu: Style Guide
          url: / flow/writing/style-guide/
Step 2: Create Issues & Note Issue Number
- menu: Flow
  url: /flow/
  desc: >
    Workflows on contributing to V² in ready to use quality.
  subitems:
    - menu: Writing Articles
      group:
        - menu: Intro Writing Articles   #176
          url: /flow/writing/intro/
        - menu: How-To Task-Templates #177
          url: /flow/writing/how-to/
        - menu: Style Guide #178
          url: / flow/writing/style-guide/
Step 3: Create Article
The trick is that now you already have the Issue Numbers and can enter them into the yml file. This saves you the step to later link the Article to the Issue.
Modal title
Hi
Lorem ipsum dolor sit amet, consectetur adipiscing elit. Vivamus non laoreet odio, vitae placerat mi. Maecenas dictum, ex vitae sodales finibus, magna ante aliquam magna, in congue tortor lacus ac arcu. Vivamus semper aliquam bibendum. Nulla a eleifend diam. Mauris porttitor velit ac ante tincidunt, cursus volutpat ligula vulputate. Nam tincidunt tortor sit amet odio scelerisque molestie at a odio. Lorem ipsum dolor sit amet, consectetur adipiscing elit.
Bye
Aliquam posuere arcu libero, quis congue leo ultrices in. Proin euismod rutrum urna sit amet ullamcorper. Integer aliquam diam eu gravida elementum. Fusce bibendum posuere augue, at sagittis enim accumsan in. Mauris luctus massa vel nunc ullamcorper, ut viverra justo sagittis. Vestibulum et felis fringilla, blandit augue a, facilisis magna. Aliquam ut nulla nisi. Donec ut arcu rhoncus, pellentesque nisl pellentesque, scelerisque odio. Fusce nec leo in elit molestie fermentum et et lorem. Maecenas venenatis hendrerit metus, sed volutpat lorem luctus in. Aliquam fermentum ac urna in blandit.