Flow
Workflows on contributing to V² in ready to use quality.
Classeur User Manual
Community Manual to the Markdown Editor Classeur
Classeur is the leading markdown IDE. This Classeur User Manual is our contribution to the Classeur community. As always, anyone can contribute. Click the V²Flow button, next click “Edit Article”. You can add a comment to the issue of this article or you can edit this article directly, resulting in a pull request.
- V²
- Plan
- Flow
- Publishing
- Classeur Manual
Get involved: edit Article, report issues and ideas, see what we are working on in GitHub. Read → More
Table of Contents
Using this Manual
Understanding the basic structure of this manual, how to take a shortcut with tutorials and how to contribute in its development.
User Manual Structure
This manual is structured in the order a new user will explore and use Classeur:
- Introduction Key purpose and list of capabilities.
- Understanding Classeur Grasping Classeur’s philosophy speeds up your learning.
- Setting Up Configuring Classeur so it works for you.
- Managing Documents 1) Create or find an Article. 2) Group articles in folders and binders.
- Writing Write your articles in markdown with powerful WYSIWYG tools.
- Publishing Post your articles on your blog or website directly from within Classeur.
- Improvements No app is perfect. Here we record improvement ideas and check their progress.
- Terms Definition of terms used in this manual.
Tutorials
Our tutorials will walk you through the entire workflow from configuration to publishing.
- Tutorial Create Account
- Tutorial Link Host
- Tutorial Managing Documents
- Tutorial Writing
- Tutorial Export ToC
- Tutorial Publishing
Passes
First pass is better than nothing: I am writing this manual to help out the Classeur team because at this time they do not have one. This also means I have no reference information other than the working App itself. In order to make it easier for you to memorize I am explaining the philosophy and underlying principles of Classeur. I also needed to make up a few item names so I can refer to them without the need to add too many screen shots. Without having a chance to talk to the author or having access to his documentation there is a chance that I got it wrong. In such cases please accept my sincere apologies.
Second pass makes it nice: You can easily give feedback with the V²Flow Button via the Article Issue or edit this Article directly. I am also hoping in the future to have the opportunity to directly talk to the author of Classeur to deliver his philosophy and gestalt truthfully in the first pass of any future writing, saving both of us the time of correcting mistakes.
Markdown IDE
To our knowledge Classeur is the first Markdown IDE which deliver you a complete integrated workflow from idea inception to publication of a finished post, article or book. Automating all steps in-between.
What it Does
Markdown WYSIWYG
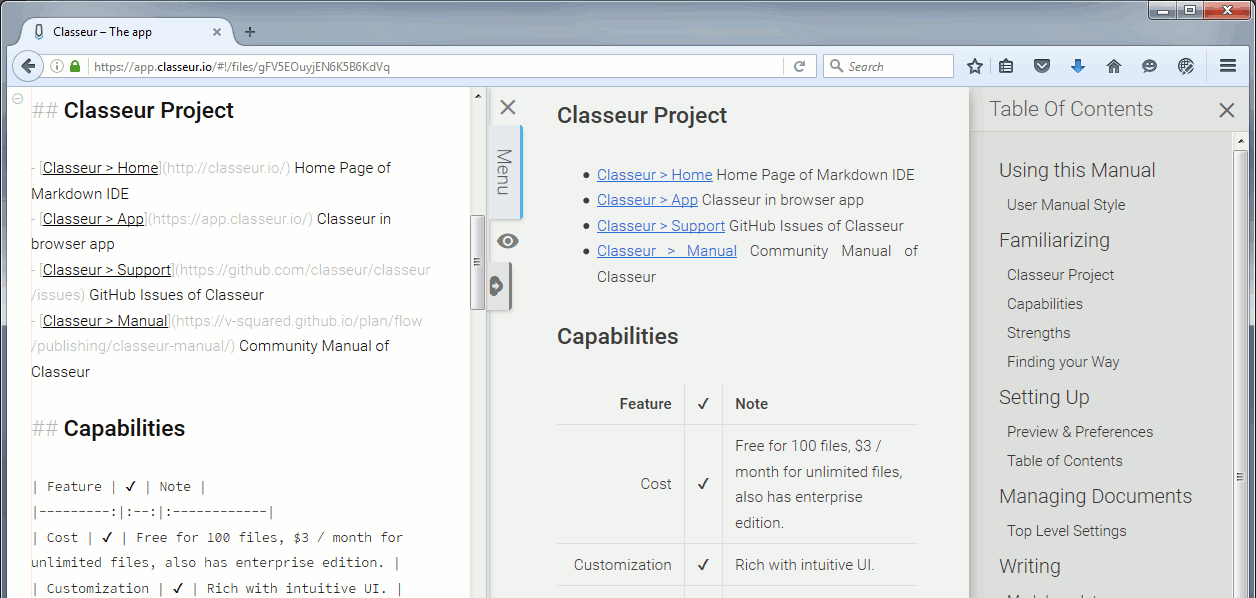
Many authors find writing in markdown more productive than using other authoring tools. In the past it came at the loss of WYSIWYG. Classeur now offers the best of both worlds: The zen style focus and speed of writing in markdown and the intuitive review power of WYSIWYG.
The snapshot above was taken when I wrote this Classeur Manual in Classeur:
- Left Pane: Markdown Source Code. This is where you write.
- Middle Pane: Live Preview. WYSIWYG. This is where you review.
- Right Pane: Live Table of Contents (ToC). This is where you navigate.
Single Click Publish

With a single click you can publish your writing. Provided you linked your blog / server accordingly.
Integrated Workflow
During writing you will go through the process of incubation, writing, editing, and publishing. Classeur supports you through this entire workflow.
Integrated Article Management
When writing on a larger body of work (blog, website or intranet server) you will end up writing on several articles simultaneously prior to publishing. Classeur offers you a complete documentation management system, enabling you to build with the same navigation structure during your development as the one used in production.
Collaboration
It promises interesting collaboration features. I will document them after I have figured out how to use them.
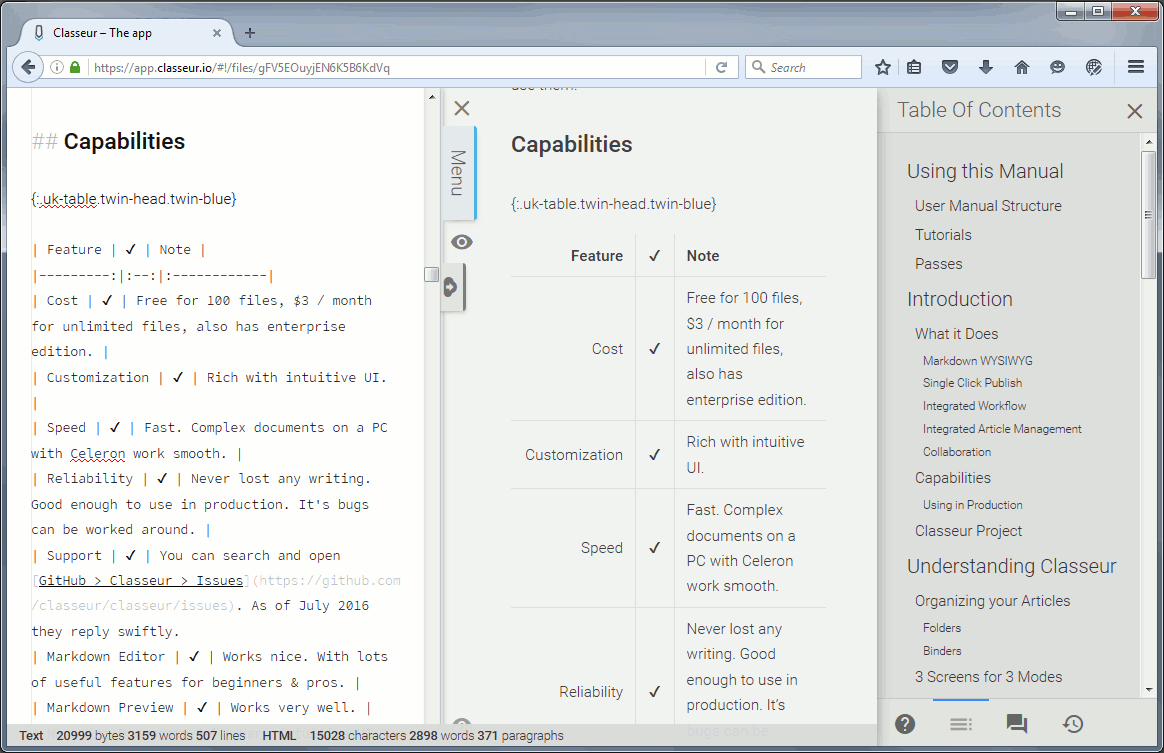
Capabilities
| Feature | ✔ | Note |
|---|---|---|
| Cost | ✔ | Free for 100 files, $3 / month for unlimited files, also has enterprise edition. |
| Customization | ✔ | Rich with intuitive UI. |
| Speed | ✔ | Fast. Complex documents on a PC with Celeron work smoothly. |
| Reliability | ✔ | Never lost any writing. Good enough to use in production. Its bugs can be worked around. |
| Support | ✔ | You can search and open GitHub > Classeur > Issues. As of July 2016 they reply swiftly. |
| Markdown Editor | ✔ | Works well. With lots of useful features for beginners & pros. |
| Markdown Preview | ✔ | Works very well. |
| Managing Documents | ✔ | Very intuitive UI. Works well and smooth. |
| Export | ✔ | Exceptional Export functionality: Markdown, Plain & styled HTML, PDF, RTF, OpenOffice, Word, EPUB, LaTex, and many more through PanDoc. |
| Cross Platform | ✔ | Runs in browser! |
| Offline Editing | ✔ | Firefox Version available. Windows coming soon |
| User Manual | ⚠ | This Classeur > Manual is a community project. It is not complete yet. |
| Zen Mode | ⚠ | Nice to use. But complex to turn on. Only works without Preview & ToC. Scheduled to be fixed soon. |
| Table of Contents | ⚠ | Usable, but with bugs requiring workaround. |
| GitHub Push / Pull | ⚠ | Push is implemented, Pull is not. |
| Image Preview | ⚠ | Works with absolute URL, but not with relative. |
| Kramdown | ⚠ | Some features are supported, such as Definition List while other features are not supported, such as Header ID. I will ask the authors about this after more pressing matters are settled. |
| Share & Collaboration | ? | Sounds very useful. Not explored yet. |
| Publish | ? | Supports: Blogger, Dropbox, GitHub, Tumblr, Wordpress. I will write about them in time. |
Using in Production
We have found Classeur to be complete & stable enough to use it in our production flow. As you can see in the capabilities list above, it lacks some important features and has bugs. But frankly we have not found a better alternative. It is an open source project on GitHub with friendly and responsive developers. As such we are contributing what we can to fix any open issues.
Bottom Line: We work much faster and have more fun at work with Classeur than without! As such it is highly recommended for anyone implementing a markdown based publishing workflow.
Classeur Project
- Classeur > Home Home Page of Markdown IDE
- Classeur > App Classeur in browser app
- Classeur > Support GitHub Issues of Classeur
- Classeur > Manual Community Manual of Classeur
Understanding Classeur
The Markdown IDE Classeur is very powerful. Remembering all its functions and how find your way around will be much easier after you understand its principle ideas:
- Organizing your Articles
- 3 Screens for 3 Modes
- Exploring Screen
- Settings Screen
- Writing Screen
- Writing-Menu Screen
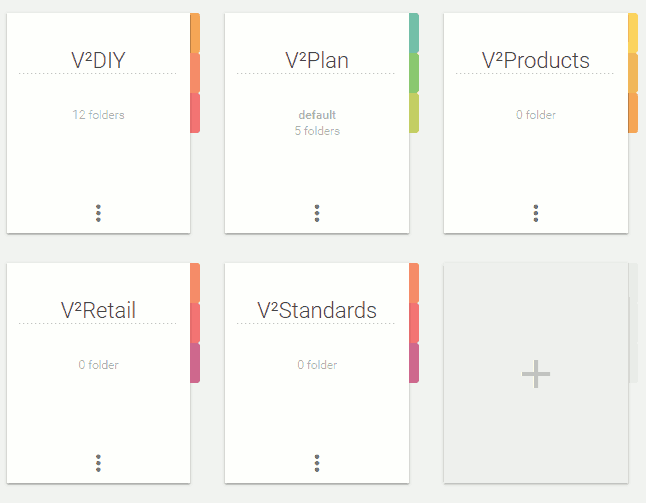
Organizing your Articles
Classeur organizes your documents in just the same way as you would file them in the physical world:
- Folders group Articles
- Binders group Folders
Folders
(??? I need to make a new snap shot after I reorganized my folders and binders)
Binders
3 Screens for 3 Modes
When creating articles you will be in one of three work modes:
- Exploring: Explore and manage your Articles: 1) Create or find an Article. 2) Group articles in folders and binders.
- Settings: Global configurations for Classeur and its connected services. Make Classeur work for you.
- Writing: Get your writing and publishing done.
- Writing-Menu: Sub-screen of Writing containing all editor’s menu functions.
Classeur is supporting your work modes by offering an optimized screen for each work mode, putting the tools you need in each mode at your fingertips. Below we look at each screen and its key elements. This will give you an overview of where things are and how they are related in the context of your writing workflow.
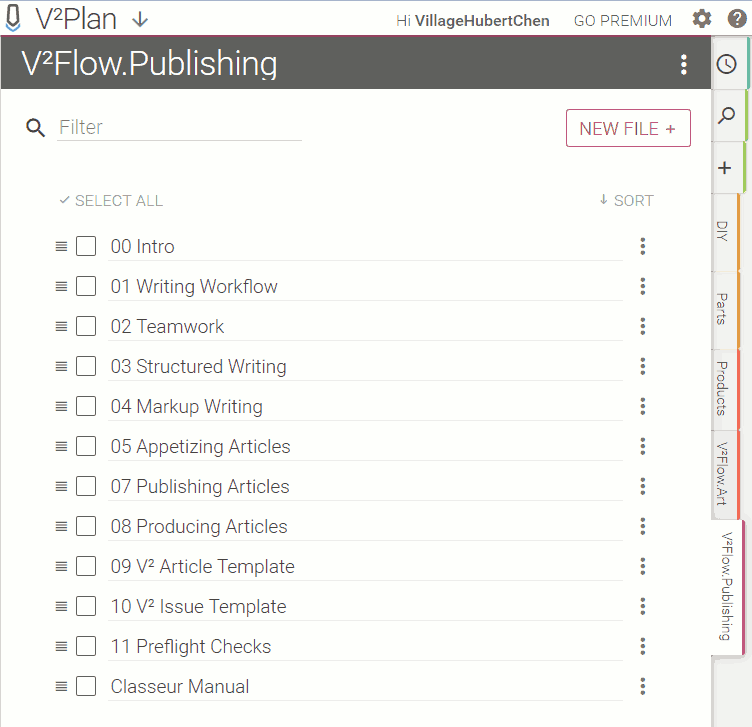
Exploring Screen
Classeur Navigation: This is the heart of Classeur navigation. From here you can go anywhere. This is also your landing page after closing a Writing Screen or Settings Screen. This is important to understand to avoid getting lost. Say you go to the Settings Screen from within the Writing Screen and you close the Settings Screen. You will not return to the Writing Screen but to this Dashboard Screen.
Article Management: You can do all the things that a file explorer offers in your OS: Finding, moving, deleting, renaming of articles aka documents aka files.

- Current Binder.
- Change Binder Icon.
- Login Account.
- Explaining value of Classeur Premium.
- Go to Settings Screen.
- List of Recent Articles.
- Find Articles.
- Add a new folder.
- Folders of this binder.
- Filter list of articles. Handy if you have a lot in one folder.
- Create a new article.
- Filtered list of all articles in this folder .
- Pick sorting order of article list.
- 1) Choose sharing option of article 2) Rename Article, 3) Delete Article.
- Click article name to open it in the Writing Screen.
- Article handle. Used to drag and drop the article to folder tabs.
Tip: These screenshots are made of a configured Classeur app in order to show you Classeur’s power and also to give you a vision as to where you want to go. When you open Classeur for the first time on your PC it will look more empty. Have no worries. In the tutorials we will walk you through on how to get from there to here.
Settings Screen
This is the place where you configure Classeur so it will work for you:
- Title of Settings Screen
- Close Settings Screen and return to Explorer Screen
- Global settings for Classeur
- Your Classeur User Account
- Manage, add and pick your host to upload articles. Supported: Blogger, GitHub, WordPress and Zendesk.
- Recently deleted articles
- Link to Privacy Policy article
- Link to Terms
- Classeur keeps you logged in until you Sign Out.
- Link to Classeur on Twitter
- Link to Classeur on Facebook
- Link to Classeur on GitHub
Writing Screen
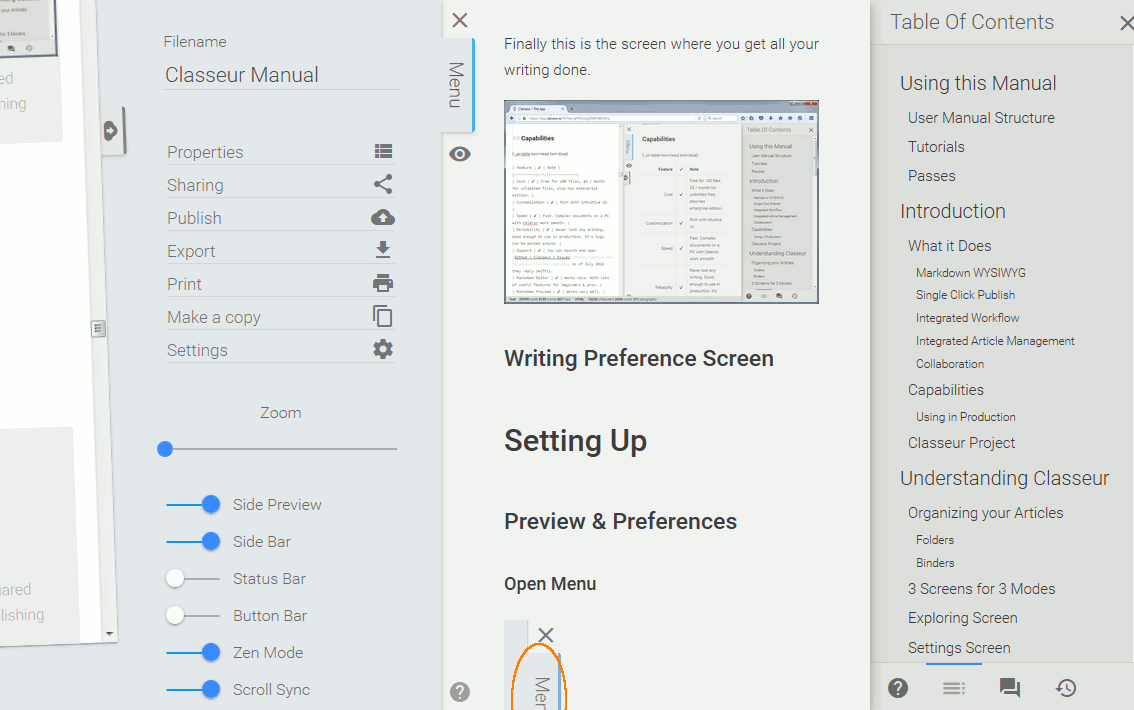
Finally this is the screen where you get all your writing done.
- Tab Name. On first load it shows you the document name. On reload it shows “Classeur”. We hope in the future it always shows you the document name → Document Name lost in tab on reload #150
- Your document’s URL. You can bookmark the link to this article.
- Markdown editor pane.
- Side Preview pane delivering live rendering of your markdown source code. You can turn Side Preview off.
- Side Bar pane, in this snap showing ToC. Side Bar can be turned off.
- Status bar showing statistics of your document. It can be turned off.
- Buttons to configure options of Side Bar: 1) Markdown Help, 2) Table of Contents, 3) Discussions 4) History.
- Vertical Menu Bar. Clever idea to save vertical space so you can see more of your text.
- Close Writing Screen and return to Explorer Screen.
- Open the Writing-Menu Screen. For more details see below.
- Preview. Distraction free final rendering of your markdown article.
- Upload or Synchronize button. In this case showing the upload button. Once configured you can push your writing to your production server / blog platform with a single click.
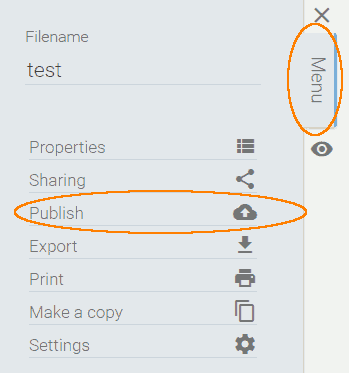
Writing-Menu Screen
This sub-screen of the Writing Screen contains all editor’s menu functions. This screen is revealed when you click on the vertical menu button. This is Classeur’s clever way to save vertical space, which is always a good thing for an editor.
- Press Menu button to unfold the Writing-Menu Screen. Press again to return to writing.
- The Writing-Menu Screen containing below adjustment buttons, requester and screens:
- Stay on this article menu entries: Click opens a requester on topic. Close requester returns to here.
- Make a copy button instantly does so and you will continue writing in a copy of this article.
- Settings leaves article and opens Settings Screen.
- Writing Screen Preferences configures your Writing Screen.
Setting Up
Writing Screen Preferences
- Open Writing-Menu Screen
- Adjust the Writing Screen Preferences. See below table for more details:
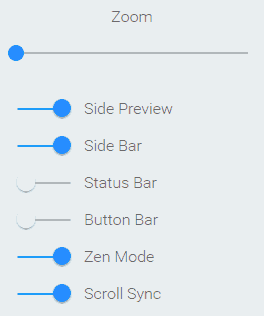
All changes are instant (except for Zen Mode). See below for more details:
| Setting | Description & Recommendation |
|---|---|
| Zoom | Global font size for all Classeur Windows. |
| Side Preview | Real time “what you see is what you get” (WYSIWYG). Most useful. |
| Side Bar | A third pane right to Side Preview offering 4 options: Help, Table of Contents (ToC), Discussions, History |
| Status Bar | Delivers document’s statistics. We turn it on when needed and off otherwise for benefit of more writing space. |
| Button Bar | Quasi WYSIWYG formatting toolbar. Very useful to beginners. |
| Zen Mode | Dims the UI to let you focus during writing. → Zen Mode. |
| Scroll Sync | Synchronizes scrolling of preview pane with the writing pane. If you use Side Preview you will want this one to be on! |
ToC Depth Settings
This setting adjusts how many levels are shown in the Inline ToC (Table of Contents):
- Open Menu > Properties
- Enter Key: ext:markdown:tocdepth and set value: 2
- Click OK

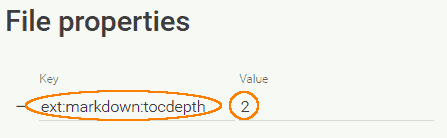
Note: You can choose values from 1 … 6. Tests have shown that most online readers find one level too coarse and 3 levels too detailed. This is different than in print media where 3 … 4 levels are standard.
Tutorial Create Account
- Go to Explorer Screen, e.g. by clicking → https://app.classeur.io/
- Click “SIGN I WITH GOOGLE”
- Follow the instructions

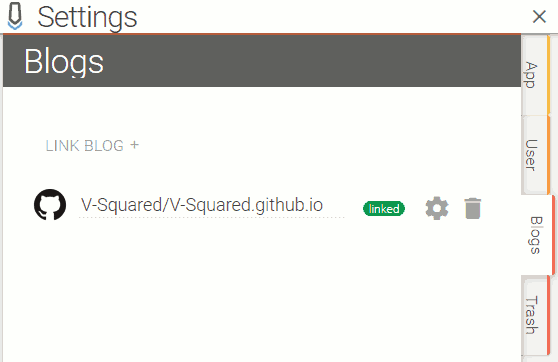
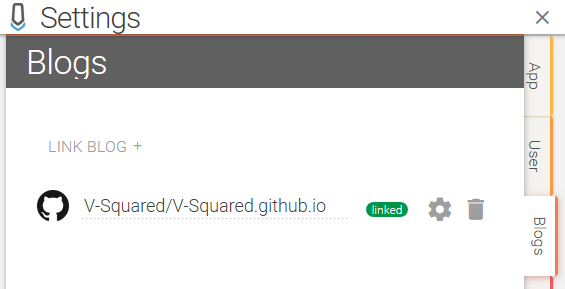
Tutorial Link Host
- Go to your → Settings Screen.
- If you are on the Explorer Screen click the gear icon ⚙
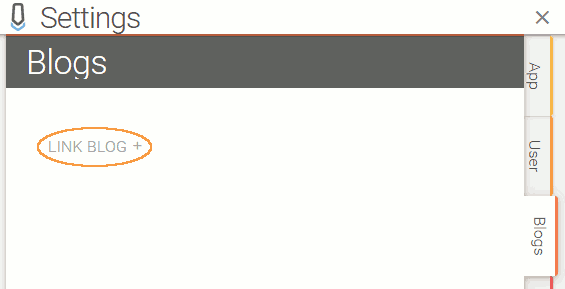
- Click the Blog Tab:
- Click the LINK BLOG button
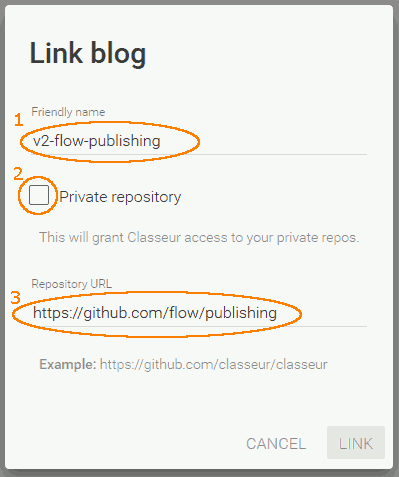
- Select the platform. In our case GitHub.
- Fill out the Link Blog Requester
- Click OK
- Authorize Application via GitHub
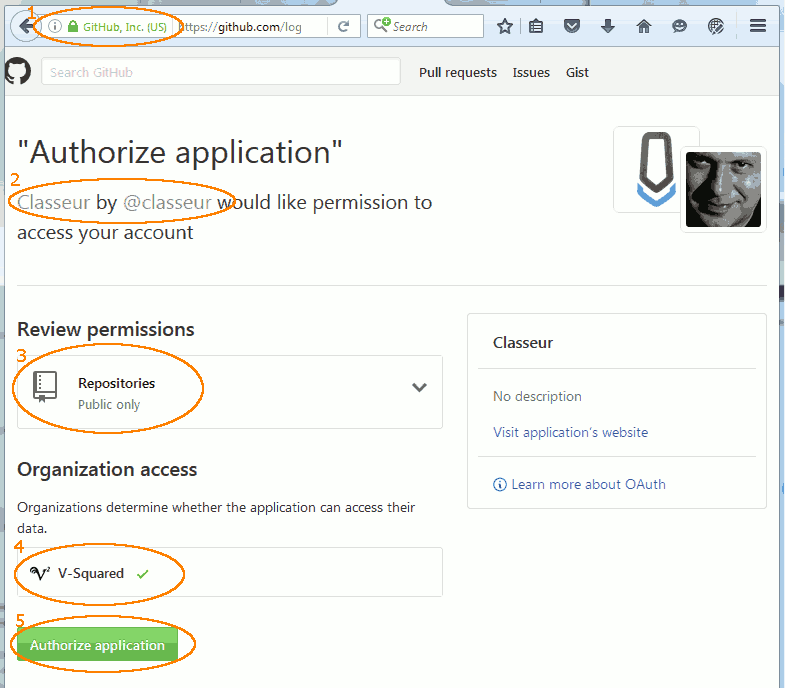
- For safety reasons compare 1 … 4 for authenticity.
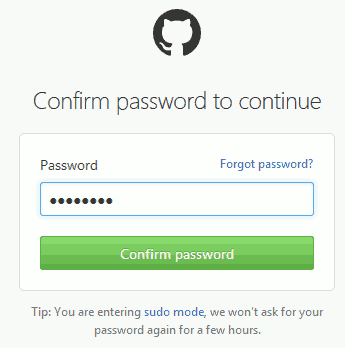
- Confirm GitHub password:
- Your Linked Host is now listed in Setting > Blogs
Tutorial Managing Documents
To reach the Explorer Screen close the Writing Screen or Settings Screen. Or simply click → https://app.classeur.io/ or type it into your browser’s URL field.
- Current Binder.
- Change Binder Icon.
- Login Account.
- Explaining value of Classeur Premium.
- Go to Settings Screen.
- List of Recent Articles.
- Find Articles.
- Add a new folder.
- Folders of this binder.
- Filter list of articles. Handy if you have a lot in one folder.
- Create a new article.
- Filtered list of all articles in this folder .
- Pick sorting order of article list.
- 1) Choose sharing option of article 2) Rename Article, 3) Delete Article.
- Click article name to open it in the Writing Screen.
- Article handle. Used to drag and drop the article to folder tabs.
Selecting Binder
- Click the Change Binder Icon
- Click the binder in which you want to work. You will return to the Explorer Screen with folders shown of the newly selected binder.
Searching Articles
Browse Recent Articles
- Click the recent folder with the four o’clock icon: 🕓.
- Browse the list of recent articles.
- You can narrow down the list by typing a filter.
Article Search Field
- Click the search folder with the magnifier icon: 🔎.
- Enter your search phrase.
- Browse the list of search results articles.
Moving Articles
Moving within a Binder
- Locate the article using any of the methods described above.
- Click onto the Article handle and then drag the article to its new folder tab.
Moving between Binders
- Navigate to your target binder.
- Click the Change Binder Icon.
- Click the binder which you want to move the article to.
- Open the tab: “Search”.
- Find the Article you want to move to this binder.
- Drag the article using its handle into the target folder of this binder.
Open Article
- Locate the article using any of the methods described above
- Single click the article. It will open the Writing Screen.
Writing
- Markdown Intro
- Zen Mode
- ToC, Navigation & Scrolling
- Suggested Window Setup
- Current Preview Limitations
- Tutorial Writing
Markdown Intro
Classeur is a markdown editor. If you are not familiar with markdown you will want to read this introduction article → ???
Zen Mode
Benefits of Zen Mode
Zen is about you being in the Zone as in writing so focused that you forget anything else but your writing. Classeur assists you in entering the Zone via the Zen Mode which will fade the Classeur UI so all that is left for you to see: Is your writing!
Turning on Zen Mode:
- Click Menu, enable the “Zen Mode” button
- Turn off Side Preview (if it is on, Zen Mode is disabled)
- Turn off Side Bar (if it is on, Zen Mode is disabled)
- Start typing without using the mouse
- Wait for 5 seconds (during which you can type or not after you began typing)
- Zen Mode will turn on automatically, by fading out the UI
Note: We created an issue to request that turning on Zen Mode becomes a single click. Zen Mode: Trigger as soon as user begins typing #146
Limitations
Currently Zen Mode does not work when Preview, and / or Side Bar is enabled.
Note: We created the issue → Zen Mode: Trigger as soon as user begins typing #146 and hope the authors will remove this limitation soon.
ToC, Navigation & Scrolling
Inline ToC

You can insert a Table of Contents (ToC) anywhere within your document with the [TOC] command.
Note 1: For the [TOC] command to be recognized by Classeur it needs a leading empty line and to be the first command in that line.
Note 2: You need to insert the Inline ToC for HTML ToC export to work.
Side Bar ToC
Navigation by ToC
When writing long articles you will want to use your Table of Contents (ToC) for two purposes:
- Inspect the
Navigation by Folding
Scroll Sync Trick
In → Preview & Preferences you enabled Scroll Sync. It means that when you scroll one pane the other pane scrolls accordingly. This works mostly as expected. But sometimes a line of source code expands to much more in the preview pane. In such case scrolling the left pane leads to accelerated scrolling of the right pane. If that is not desired, simply move your cursor to hover over the right pane and use your scroll wheel for a more controlled scrolling experience.
Suggested Window Setup
This is my setup. As always your mileage may vary :-)
- Two 1080p Displays:
- Left: Writing. I am sitting in front of this one.
- Right: Reference as in research and final review. Placed to right hand side further away. This is OK as I only use it for reference and not for work.
- Left Window Tabs: (Writing)
- Classeur Article: This is where I write the article
- Appetizing Articles: My reference for more fancy formatting
- ToC Converter: Tool to convert HTML ToC to YAML ToC
- HTML Export Page: Export generated from Classeur for ToC
- HTML Source: HTML Source Code of previous page
- Right Window Setup: (Reference)
- Article Blog Page: In our case the published article on V²Site
- Article Issue: Linked issue to this article. Our todo lists.
- All sorts of Research: Various tabs containing research to my writing
Current Preview Limitations
We really like Classeur Preview!
In this section we are going to list limitations of Classeur’s preview. Before doing so we want you to know that as it is the preview function is more than usable in production. In fact we enjoy using Classeur. We are a picky bunch, we do not say this very often. Having said that, it is important to understand Classeur’s preview limitations and the available workarounds:
No Style Sheets
No Relative Links for Images
No Permalinks for Headings
Tutorial Writing
Note: I will write it if later after going through the editing process of the first pass.
Publishing
- Publishing Power
- GitHub Pages Publishing
- Create ToC
- Push to GitHub
- Creating Classeur Account
- Tutorial Export ToC
- Tutorial Publishing
Publishing Power
Publishing workflows vary wildly. Classeur is very flexible in this regard. It supports a large variety of publishing platforms and data formats.
Integrated direct upload:
- Blogger
- Dropbox
- GitHub
- Tumblr
- WordPress
- Any other publishing platform via copy and paste.
Export Data Formats:
- Markdown
- HTML (plain & styled)
- RTF
- OpenOffice / LibreOffice
- Word
- EPUB
- LaTex
- And many more through PanDoc.
As such it also gives you enough rope to hang yourself. There are simply too many possible workflows to document them all here. Instead we are documenting but one, in the hope that you can use the above list of capabilities in combination with the fully described workflow below to create your own publishing workflow.
Note: You should be able to use most of the workflow for your purposes. E.g., it is likely that your publishing system will require a Table of Contents. We show you how to create in the most common formats: HTML, JSON and YAML. We also show you how to link Classeur to GitHub. Once you see how you can link one platform it shall be easy to link to the others.
If you have documented your workflow and would like to share it to help others, then use the V²Flow button to create a fork of this article, add your workflow and make a pull request so to share it with others.
GitHub Pages Publishing
Create ToC
Verify has Inline ToC
You only can export your ToC (Table of Contents) if you have inserted an → Inline ToC in the first place.
Export HTML ToC
HTML ToC → YAML or JSON
Add ToC to Front Matter
Push to GitHub
Creating Classeur Account
Open Publishing Preferences
![](/plan/flow/publishing/classeur-manual/
Tutorial Export ToC
Tutorial Publishing
Note: I will write it later after going through the editing process of the first pass.
Remaining Mysteries
Export Pandoc TOC
I found no way to export the TOC. Since we need to export the ToC, this would have been useful. We are now using HTML export and manually copy paste the ToC from the HTML source. A bit crude and a pain to describe in a manual, but it works.
Modes
Improvements
Setup Classeur
- Sections to get titles: This way is easier to refer to a section in the manual
Related Open Issues
Terms
- Screen
- User interface page on a specific topic. E.g. Explorer Screen, Settings Screen, Writing Screen, etc.
- Term 2
- Definition 2
Sort In
Automatic ToC
- Write in Classeur Manual how to limit ToC to 2 Levels
- http://classeur.io/help/extensions/
- Automatic Table of Contents Generation #130
Report to Classeur
- Life ToC also respect heading depth
- Create simple document H1, H2, H3 to reproduce
- Show how configured ToC
Modal title
Hi
Lorem ipsum dolor sit amet, consectetur adipiscing elit. Vivamus non laoreet odio, vitae placerat mi. Maecenas dictum, ex vitae sodales finibus, magna ante aliquam magna, in congue tortor lacus ac arcu. Vivamus semper aliquam bibendum. Nulla a eleifend diam. Mauris porttitor velit ac ante tincidunt, cursus volutpat ligula vulputate. Nam tincidunt tortor sit amet odio scelerisque molestie at a odio. Lorem ipsum dolor sit amet, consectetur adipiscing elit.
Bye
Aliquam posuere arcu libero, quis congue leo ultrices in. Proin euismod rutrum urna sit amet ullamcorper. Integer aliquam diam eu gravida elementum. Fusce bibendum posuere augue, at sagittis enim accumsan in. Mauris luctus massa vel nunc ullamcorper, ut viverra justo sagittis. Vestibulum et felis fringilla, blandit augue a, facilisis magna. Aliquam ut nulla nisi. Donec ut arcu rhoncus, pellentesque nisl pellentesque, scelerisque odio. Fusce nec leo in elit molestie fermentum et et lorem. Maecenas venenatis hendrerit metus, sed volutpat lorem luctus in. Aliquam fermentum ac urna in blandit.